Pages

Thursday, November 2, 2017

DIY Hairpin Leg Dining Table


Our "dining room" has been a source of contention for a few years now.  I say "dining room" because we are talking about a 8x7 area of space - hardly adequate dining room material. It's cool though - most of our meals are centered around our sofa.  Our ability to balance plates has been mastered.

But, with a kiddo coming, and the holiday season upon us, it's time we retire the sofa, and actually sit and stare at one another.  Do I dare say, converse?

I'll tell you, the thought has always been there to utilize our dining room space.  Which is why we have gone through 3, soon to be 4 dining room tables in less than a year.

First we had our pine harvest table - pretty, but pretty big.  And, for all of you wood fanatics, you are probably aware that pine is annoyingly soft wood.  I swear putting a fork on the table left an imprint.


We sold our harvest table and graduated to a Versa table from West Elm... because that's what adults do.  But it ended up being way too small.  Two chairs, easy.  Four?  Hard.  A great pet peeve of mine is when you can't push your chair in all the way.  I'll chalk it up to being a preschool teacher in another life, and seeing kids smash their faces on the ground after tangling their feet in the legs.  I mean, I'm okay with my face.

Credit: West Elm
As of now, our lovely Versa table is hanging out in the basement, soon to be used as a Lego landing station for epic builds.  After the Versa, we opted for a round table - haven't tried that shape yet!  Round, danish style tables aren't the easiest to comeby, and the ones we did see were either white, or more bang than what we had for bucks.  We took to AllModern for a solution, and found one with deep discounts.  The table was easy to assemble, and certainly great quality for $250.00, but we were back to square one, again, with the chairs not having space to be pushed in.  The table has a nice walnut finish, but I don't exactly know the type of wood used - it's soft or faux, this I know, because we nicked it up with little difficulty.

Credit: Felices Dining Table - All Modern
A week ago I started looking around for yet another table.  I've always had a thing for hairpin legs, and found a nice little set on Amazon.  With little thought, I ordered four 28" legs in black matte, and started reading up on other desperate DIY dining room table enthusiasts.  I found some great tutorials on DIY Hairpin Leg dining tables that are very simple.  You can check them out here and here.

Now that I had my inspiration, all that was left was to convince the hubby that we needed this.  And because pregnancy trumps all... well, there you have it.

Sometimes in order to get what you want, you have to do your research.  In this case, research meant measurements.  I took some painters tape and measured a 40" x 6' space and marked it off.  Visuals are huge with the husbands, ladies.


The other DIY table sites went with premium wood boards from the lumber yard.  Most boards in the lumber yard are pine, and since we have already dealt with a soft table, we wanted to check out some other options.  Our town doesn't have a lumber yard with specialty/exotic wood that I'm familiar with, so Menards seems to be our go-to.  There, we checked out their specialty plastic-wrapped wood.  In the past, we have used a lot of poplar for projects because of its gorgeous variance.  But if you look at the wood scale, poplar is, once again, soft.  And for those of you whose mind went there (like mine every time I type wood, soft or hard), I'm talking about trees, although I'm sure we can all agree that hard is always best no matter the situation.

This go around, we grabbed four 1"x8"x6' maple boards and one 1"x6"x6' hickory board (to use as a decorative runner essentially).  All hardwood.


Another thing we did differently is we used the Kreg Jig instead of screws and a drill to get the tightness and precision we were looking for.  Both ways will create a stunning table, but if you are seeking longevity, maybe check into a Kreg.  Pretty inexpensive ($39.98) for the magnitude of what it can do.


Once all pieces were secure, we attached some supports underneath using premium oak from the lumberyard.  First, we pre-drilled our holes to avoid splintering before securing the wood using screws.


After the supports were in (underside):


Topside of table:


The table was stained using Varathane wood stain in dark walnut, to match our cafe chairs.  After applying the stain, wait 3-4 minutes before wiping off the excess.  Reapply as needed to achieve your desired color.  We opted to do one layer to achieve the look we were going for.  To help aid in protecting the wood finish, add 3-4 coats of clear matte polycrylic, lightly sanding with 220 grit sandpaper in between coats. Like other sites, I would agree that using a coaster for cold, sweaty beverages will help protect the table, and prevent any unnecessary water marks.


Staining process:


Once the table dried, we attached the hairpin legs.  Our hope is that this little table will stick with us for awhile as our family grows and memories are centered around it for generations to come.  After all, there was a lot of love and teamwork thrown into it.

As far as materials, we spent just under $200.00 - which in the grand scheme of things is pretty damn cheap when you compare it to an average of $600.00+ for other store bought maple hairpin leg dining tables.  Our plan is to build a matching bench in the coming months, and will certainly update this post with our progress.  Without further adieu, the after:


I hope this post serves as some inspiration and confidence boosting for your future DIY dining table endeavor, because...


Thanks for reading and happy building!

Wednesday, September 27, 2017

Campaign Dresser 3.0

So, I'm here again.  You know when I said that there are times where I do shit, and I can't leave it alone.  There is something off about it, or something I half-assed (let's get real here), and you can't appreciate exactly what you did until that little thing is fixed?  Have I rambled enough?  I think so too.

These campaign dressers.  Man, I knew they were going to be something that would require work. Who knew I would be talking to you about their third update.

Just to recap - remember when?

Not terrible.  I was clearly very excited at the time. But, let's get back to half-assing.  I never actually got around to attaching the wood.  In the two years or whatever, the wood slid around, scratched up the top and my ego.

Then I had an epiphany.  These dressers were never conjoined in the first place.  So why dress them up like they are?  It was time for these sweeties to part ways.

They got a new paint job - different colors.  And were encased (or topped) with some good quality poplar wood, stained and secured with brads.  The hardware got a new metallic paint job too.  If you can make your original hardware shine with a little love and elbow grease, by all means.  But this brass hardware went from pretty to dingy in a month.  Plan B.

Spray Painting Hardware Tips:

For perfect hardware the first time and every time, pick up some Clean Metal Primer by Rust-Oleum. This is one serious heavy metal ass kicker.

Give your hardware a nice, even coat of primer and let dry.  Flip hardware over and spray other side.  Any knicks or debris can be sanded with fine grit paper.  Spray additional light coats as needed. Once your primer is set, any paint type, color, sheen, you name it, will be flawlessly applied.  Let dry.


While the hardware was basking in the sunshine, I began sanding away flaws that I overlooked the last time I decided to "fix" these dressers.  I noticed there was still a lot of leftover laminate stuck in various spots.  The medium-coarse grit sandpaper and orbital sander took care of that.  With the wood settling over the years, there were some tight spots.  A little buffing allowed for the drawers to glide a bit more easily.  Once the sanding was done, I took a damp shop cloth and wiped down all surface areas.


Onto the painting!  I did two different colors for two dressers - I used Rust-Oleum's 2X Ultra Cover in Antique White, Satin finish, for the babes room and Stone Gray in Satin for our bedroom.  Hardware was painted in Rust-Oleum Universal Pure Gold.

When it came to the wood, I can't remember if we went with a large slab of poplar (my favorite), or pine.  The wood was cut to size, sanded, and stained.  I ended up applying a few coats of poly to the top of the babes dresser - just in case convenience factor plays a role, and we use that space for a changing table.  I don't need shit getting into the grooves.  No puns here.

Otherwise, the wood was stained with Minwax in Puritan Pine and Natural.


The babes dresser was completely encased in wood.  Only a top and bottom trim piece were added to the dresser in our bedroom space - it's interesting how much room an inch takes up when you have limited space to work with.  Small brads were used to secure the wood to the dressers.  We opted to carry the dressers inside before securing the wood slabs.  One of the smarter choices we've made - because those dressers are heavy AF with the added wood. 

Here's a little snapshot of the beans dresser:


And ours:


Same same but different.  But still same.  On that note. 

Happy fall!

Tuesday, September 26, 2017

DIY Babe Bedskirt

Lately I've been having one of those this is your brain and this is your brain on baby moments.  Baby brain is not a joke.  When pregnant mommas would use baby brain as an excuse, I always secretly thought, eh... whatever you need to tell yourself.  I'm sorry.  I take it all back.  With that said, I have a baby-brain friendly DIY project for you, pregnant mommas.  Just don't touch the iron.

What you'll need:
  • Hot Iron/Board
  • Ironing Tape
  • Pom-Pom Trim
  • Pins and Needles
  • Crib Bedskirt
  • Scissors
For starters, I was at TJ Maxx and came across a periwinkle-blueish crib skirt for $3.99 made by Aden and Anais.  When shopping for crib skirts (and other baby things), remember to check your local Maxx - totally worth the savings.  With the extra money, I went to Hobby Lobby and picked up a few yards of giant pom-pom trim - apply your 40% off coupon for added savings.  Add on $2.99 for iron-on adhesive, and the project cost was around $14.00.  A full-price crib skirt by Aden and Anais runs you between $29.99-$49.99.  Deals, deals, deals!


Step 1:  Pre-iron your crib sheet to get rid of any creases or wrinkles.

Step 2:  Line up your pom-pom trim with the length of your crib sheet and cut.  On the backside of your trim, iron on the adhesive - the adhesive I picked up has two sides.  One side is ironed on first.  Once secure, you remove the top paper layer, and lay it on your fabric, ironing again.  Make sure to follow the instructions to achieve the best application with your adhesive tape.  

Step 3: With the adhesive paper removed, begin pinning your trim directly on top of said adhesive strip.  


Step 4:  Carefully iron your trim, holding it for a few seconds to create a nice, strong bond.  As you continue to iron, remove pins as you go.


Step 5:  Continue all the way around the bedskirt as desired.  I only attached the pom-pom trim to the front and sides, avoiding the back, because with the way we set up the crib, no one sees that part anyway.  Out of sight, out of mind.

Step 6:  Install... er drape, and you're done!  Way to be awesome mom... or dad.  Your kid will surely enjoy looking at those balls during 3 AM feedings.  Onto the next project!


Coming Out... In Style

"I'm comin' out baby, I'm comin' out." Actually stay in.  At least until January.  Because...

We're pregnant!

Who knew typing those two little words (in the same sentence) would feel so... liberating?  Especially since I never thought I would.

I know there is a time and a place for every story.  And similar to a lot of couples, what a story we have.  But today is not the day.  Instead, I want to let every couple, who are making their way through the process of seeking fertility treatments, to know that you're not alone.  It's okay to be disappointed and angry.  It hurts so much because it matters.  But, your time will come, and when it does, it's going to mean that much more, knowing it didn't come easy.  And oh, what a loved babe they will be.

We are about 55% loaded, and still 45% shocked.  Even after the first few months of getting through the yuck, I still can't believe it.  Then my bladder gifts me with a punch-to-the-gut reality check.

We haven't jumped in and bought the entire nursery just yet.  Since we are pretty minimal people by nature, we are doing the research on items that will not only last us awhile, but will take care of what our baby actually needs, you know, the no-nonsense bare-necessities, mixed with a little hakuna matata for good measure.  We kinda want to live in our home too.

Right now my focus is on food.  Um, other food... more food and what the f*** am I going to wear because of all of this food?

I'm kind of in that middle stage, where a rubber band looped around the button of my skinny jeans isn't cutting it anymore, and honestly, the thought of skinny jeans, in general, makes me want to scream.  But I'm also not needing full belly coverage to mask over stretched skin... yet.

So, what is a girl to do?

For starters, I was under the impression that the day you found out you were pregnant, was the day you would balloon overnight.  Lesson learned in common sense - it's gradual. At 3 months, you still look like you have period bloat, not a fetus the size of a plum.  By four months you look like you're trying to hide the fact you consumed an entire pizza three whole pizzas by yourself, and at five months masking anything is just a joke.  You clearly have something going on there.  I understand that every woman's journey to motherhood is different, and every body is different and handles the process in different ways.  I can only speak for my body and what works for me, but even so, I'd love to share some tips for other mama's out there who don't want to trade fashion for motherhood. Because, duh, you can have both!

As I was saying before, my "normal" clothes aren't keeping it together (literally) with my growing body.  But, it's still too early for me to head on down to Motherhood Maternity and buy my size in everything.  Instead, I've found myself checking out stores like H&M and sites like Ebay, looking for oversized t-shirts, elastic anything, and maternity jeans that don't smell like plastic and rubber.  But, the silver lining is you can get so many staples and styles without footing the bill at specialty maternity shops. With oversized style turning from a fad to a staple, shopping at "normal" shops is going to carry you well into your pregnancy.

Early-Mid Stages Style:
  • Check out stores like H&M, Free People, Anthropologie, American Eagle, Madewell, or stick with what you know. Find flouncy, forgiving tops, or ones with a lot of stretch if you want to rock that adorable baby bump.  
  • Don't be afraid to size up!!  It's just a number, I repeat, it's just a number!  This was the hardest pill for me to swallow.  I never thought I truly cared about my jean size until I became pregnant.  I had to remind myself that I'm getting bigger, because it's healthy for me and my bean, and who the F cares about what your pant size is anyway?  Answer: No one.
  • Find pant styles like joggers, or pull-on pants with cute ties and patterns.  Look, when you're pregnant, you can get away with ANYTHING.  This is your time to take chances when it comes to fashion, because no one will judge you, and everyone will think you're adorable. Because hello, bump.
  • Be comfortable.  Girl, if you can rock a pencil skirt at four months, own it, work it, finger snaps.  But, for most, the thought of anything restricting against our bodies makes us run for the hills - naked, because that's the only thing that feels good.  If that means you live in sweats out in the public world, do it.
  • Invest in few quality jackets to add to your wardrobe.  I highly recommend a bomb-ass bomber, a denim jacket, and a tailored blazer.  For one, they will help spice up your wardrobe. Two, layering is key during pregnancy, and three, these jackets will still look amazing even after your little bean has arrived.   
  • Search for cheap basics, and wear the shit out of them.  Cheap basics are perfect for layering, covering, and tucking.  Search for items like long t-shirts, and a-line dresses.  Can anyone say H&M two-fers? 
  • Bras.  Even after the first trimester, I'm still rocking my Aerie Hannah bra on the weekdays, and barely there bralettes on the weekend (but I'm also a board member of the itty-bitty titty committee).  Once again, stick with what you know, or what you think is best.  If sizing up your favorite bra gives you comfort, do it.  But, if you find yourself opting for pregnancy bras, do that too --  whatever will relieve the pain and tenderness that accompanies your growing tatas.
  • Just remember, you're strong and amazing.  You are carrying another life inside of you, my dear.  It's easy to give yourself a hard time, but ultimately, wear (and do) what is best for you and your baby.

Now that you received, like, only the best tips ever for your first few months, check out some of these stand-out one stop maternity shops for the latter part of your growing bump.

Maternity Wear Winners:
  • ASOS Maternity - Cheap, cute, chic
  • Ebay - I know what you're thinking... but, Ebay is a jackpot for gently used designer maternity wear - think Paige Denim, 7 for all Mankind, and J Brand.  Another tip is most sellers bundle their maternity wear.  3 designer jeans for half the price of one?  No arm twisting needed. **Coming from a "reputable" source, I just purchased two NWT Paige Maternity jeans for $80.00.  One pair of Paige Demin Maternity Jeans retails at $219.00.**  So... yeah.
  • A Pea in the Pod or Destination Maternity - Getting back to designer duds, if that's your thing, look no further than these retailers for mommas who don't want to give up fashion for sweatpants and potato sacks.  But keep in mind, hefty price tags and luxury brands go hand in hand. Destination Maternity does offer exclusive online deals.  In store; shop their clearance racks for additional discounts.  For an extra $3.00, you can sign-up for a year of magazine subscriptions from Family Circle and other sister magazines, free baby samples, and coupons.
  • Pink Blush Maternity - Fashion without the price tag.  Shop the current trends and styles, but in Maternity.
  • Nordstrom Rack - Check out their online store for a few good finds.  Don't expect to one stop shop since they aren't stocked up on anything really, but the deals you do find are worth a look. 
  • H&M - With a maternity brand like MAMA, you're sure to ride out this pregnancy in style, with money to spare.
  • DSW -  Let's face it, there will come a time in your pregnancy when even the maternity clothes aren't doing it for you.  No matter how cute and stylized they may be, you feel like a blimp, or a squishy marshmallow. When that happens, go shoe shopping.  I mean, it's shoes.  Insta-good.
  • Your local consignment shop(s) - if you are living in Rochester, MN and looking for maternity wear you can actually try on, check out Clothes Mentor.  They have a great variety of everything from basics to cocktail dresses.  Because maternity clothes are gently used for the most part, head to your local Goodwill or Savers.  You may have to do a little digging for some great finds, but isn't it all about the hunt anyway?  In fact, while you're at it, check out baby gear for way less.  Sure, a few special pieces from baby specialty stores are always fun, but ultimately baby bodily fluids and onesies are BFF's... don't invest too much.
That's it for tips and tricks.  Hopefully you can apply some of these ideas to your with-child wardrobe. Happy shopping!

Tuesday, April 11, 2017

Color Spotlight: Portland Gray

There she is, in all her glory.

Portland Gray.  The adorable misfit and the will to be weird of grays.  It's a cheeky gray with lavendar based undertones, that lives up to it's name, certainly.

I've been working on my art studio/guest bedroom for a number of years now. Fortunately, or unfortunately, the room is in the basement, tucked away from everyday living.  So, shutting the door and pretending the project doesn't exist has become somewhat of a routine.

Initially, I was wanting a stark white studio.  I mean, it's so modern and whatever, and any decor would totally pop against the paint.  But because the studio space is so big, it felt really cold and impersonal.  As it turns out, I have an attraction to white furniture as well. Needless to say, white furniture and white walls weren't doing the room any favors.

For reference, you can see the studio renovation progress here and here, and some additional photos below.  The walls at the time were painted Decorator's White by Benjamin Moore.  And because the walls were a little defective, we stuck with eggshell (to hide minor imperfections, but also for wipe-ability purposes).


Let me remind you that this room is pretty large - we knocked down the dividing wall that separated two bedrooms and turned it into this giant, bomb diggity, hangout spot.

After a couple of years of the bedroom being stark white, I got a hair up thee ole ass and started cutting in using some leftover Moonshine I had laying around.  I'm a big fan of Moonshine in small, windowless spaces, because it makes the room feel magnified.  But in big, bright rooms, it was showing a lot of green... a color I've been told to stay away from because it competes with warm tones.

Who pays attention to color advice anyway?

After cutting in 98% of the room, I let my logical self live with it for a few months, opening the door every so often to catch a glimpse of how the colors were coming across.

My facial expression was always questioning. And when my face says it all, it's a good sign it's not meant to be.  I told myself the next time I take a paintbrush to that room, it's because I found a forever color.

Then something amazing happened within the last week.  On a fluke, I found my forever color.  And yes, the name may have pushed me to do it.  Oregon is my favorite place on Earth.  Ever.  And Portland is my home away from home.  So, why wouldn't I want to spend time in a space painted after one of the greatest and weirdest cities on the planet?

It all started when I found myself on Pinterest looking for "unexpected neutral colors," and came across Elephant Gray. After looking at about 50 bathrooms and 30 bedrooms painted Elephant Gray, I knew I was close to solving my paint color dilemma.

Because this guest room/studio space is my haven, I finally understood the value of creating this space for me, and making choices for me, not choices that someone else may appreciate.  What I did like about Elephant Gray was how feminine it came across in every space.  With its plum undertones, it looked gorgeous combined with light grays, bright whites, and teak/walnut stains.

But... it was too dark.  Too purple.  Yet so close to what I wanted.

I started clicking on shades that were close to Elephant Gray, and came across Portland.  I knew that was my golden ticket to bedroom/studio inspiration success, and went for it. Well, kinda. I picked up a quart of Portland in eggshell to confirm via patch test, and ended up finishing off the quart, painting one wall, last night.  Even this morning I woke up extra early to see how the color faired at sunrise. Um, gorgeous.

Similar to the big paint job in our main living space using Gray Owl, I had this feeling that this is the color that is going to stick with us until the next family decides to paint over it.

It's difficult to compare colors when you're looking around online, but just for fun -- because looking at paint swatches is the funnest! -- you can see the differences and similarities between Elephant Gray on the left, and Portland Gray on the right.


And what kind of person would I be if I didn't leave you with a little room preview - and I mean little. I will be back to update this page once I sort my life out, and my studio.  Oh, and hey!  If you like what you see, er, read... subscribe!  You can never have too many self-esteem boosters.


Monday, March 20, 2017

Exploring Deep Space - Faux Fireplace Overhaul

I started this project on a whim, with no plans or expectations.  As you may have read in my previous post, Color Spotlight: Gray Owl, the entire upstairs got a paint job.  Well, most of the entire upstairs with the exception of this little faux fireplace built-in.  Behind all of that was a big, patchy, multicolored mess from all the years of painting and repainting.  


To be truthful, when the faux fireplace was installed four years ago?? it was never actually completed.  There was a lot of trim work that was missing because, eh.  

I really loved the concept of having said faux fireplace bookshelf thing, but to be honest, it was way too crowded in our living room space.  Initially, the faux fireplace bookshelf worked within the space, however, when Shane built the Tree Rings cabinet, the space got pretty jammed.  Now, being the minimalist I am, the cramped space totally bummed me out.  So much that I found my nutcase self moving the other pieces of furniture around on a weekly basis, only to move it back, then back the other way.  Last week I finally came to my senses, realizing that the living room was never going to look right until I did something about the giant mass sitting dab smack in the middle of the room.  So, I did what any loonie would do on their lunch break; I grabbed the rubber mallet and gave the fireplace a few knocks.  By the time my break was over, the shelf was successfully removed.  


Board by board, I deconstructed the built-in until I only had the mantle part remaining.  The mantle itself had absolutely no support, wiggling and wobbling, ready to snap under the weight of the top. So, I leaned it up against the wall and called it quits.  Because, well, no plans or expectations.


Time had passed and I still didn't have a clue what I was going to do with this mantle.  I really wanted to utilize it somehow.  I love a tiny house, but lately I am realizing how quickly we are running out of space for unique additions such as this.

I made a trip to the garage and found some wood scrap pieces; reconstructing the base of the mantle.  But even after adding the scrap pieces, the mantle was still movin' and shakin'.


After sorting through the pile of extra wood from disassembling the faux mantle, I found a few pieces that would aide in increasing support, and secured them to the back of the mantle with a nail gun.


The mantle went from 20 pounds to 50, I swear.  But, it wasn't going anywhere.  I mean, literally.  It just hung out.  It wasn't until Big Bull Gretzky spotted a crow in the tree eight houses down, freaked out and bumped the mantle.  In slow motion the mantle leaned farther and farther and because I am such a badass, I ran to rescue the 50 pound tipping mantle, catching it with my now bruised bicep. Girl power.

The mantle was in fact heavy AF.  My bruised bicep told me so, but it was certainly not secure.  The final decision on location needed to speed up, which resulted in the mantle sliding two feet, right into the dining room.  A few anchors and furniture wall straps later, the mantle was secure.  This time it really wasn't going anywhere.


The faux fireplace has seen it's share of dings and dents.  After some patching and sanding, the mantle was looking a little hot and a little messy.  Since I conveniently ran out of the Gray Squirrel paint by Benjamin Moore (it molded), the opportunity to explore other colors presented itself.

Side Note: My husband loves outer space.  He told me once (several times really) that if we never met, he would have been first in line for the Mars Project.  It's close, but I'd say he loves me more than the solar system.

Up until this very moment, Shane just thought I was crazy for moving shit around, again.  He's right.  And to thank him for putting up with me, I wanted to incorporate a color just for him.  I present to you, Deep Space by Benjamin Moore.  It's a very dark, slate-like blue.  Needless to say, he was a fan.

So was I.  Now we can make routine visits to deep space anytime! And seriously? Check out that sexy trim job.


I really liked the idea of having shelves in the mantle, but as I said before, it was just too much noise in such a small area.  The noise was accompanied by anxiety when it came to decorating, and more to dust.  Now, I can still decorate the mantle for all seasons, but it isn't hoarding space in the process.  Just clean, simple, lines.  The best part is the mantle is officially portable, which means endless possibilities!  Maybe I'll move it somewhere else in a week?  The odds are always good.
The mantle is more or less a piece of wall art now; similar to the chair at the Walker that's adhered to the wall with two legs and a tissue box sitting on top.  Seriously.

The other side of the room is a different story.  I'm currently on the hunt for a decent MCM or Danish inspired credenza/media console that doesn't cost a mortgage payment.  Until then, the remaining built-in piece is going to have to hang out until I'm ready for it.  It's a start anyway.  Wishing you all a fabulous first day of spring! 


Thursday, March 16, 2017

Color Spotlight: Gray Owl

Is there is such thing as New Year's irresolution?  If so, I'm totally owning it.  I'll be honest when I say that even though I feel like I have been busy with home projects - they are the kind of projects that don't require a lot of skill, how to's, or shortcuts - and are probably not worth documenting, or your time.

We have a ton of projects on the back-burner, waiting for better weather.  A few include new windows, patio door, kitchen remodel, and a continuation of landscape updates from last year. Confident my plants decided to die and not come back this year, but only spring will tell.  This means, big bucks being spent.  It also means hanging around the house more saving for said bucks.

But...

With all of this time being spent in the house comes itches and scratches of wanting to do things that are more or less in my control.

For example: Repainting the upstairs for the fifth-ish time.  I've been sitting on the fact that I wanted to repaint everything upstairs for months now, but was waiting for the perfect opportunity.  I got that when Shane left for the weekend.  Husband is away, paint brush comes out to play.

Up until a couple weeks ago, we had a combination of Manchester Tan and Shaker Beige splashed across the main living area walls.  People change, style changes, preferences change.  I know I've mentioned in previous posts that the Manchester Tan was a paint color suggested by one of the specialists at Hirshfield's.  Although they are extremely knowledgeable, I was blindly asking a specialist what color to paint my living room, a place she had never been. Color of the year in 2010 was none other than Manchester Tan, so I can understand the suggestion.  However, just because it's a beloved tone, doesn't mean it's treasured in this piece of split.  Our windows face east and west, and in natural daylight, the color was tolerable.  But when the sun started setting, the color took on this I've been smoking three packs a day inside my house yellow.  Ishy.

Picking the color was a whole other battle.  I researched various colors starting in October, and just wrapped up painting in March.  The goal is to never paint our upstairs, like ever again.  After reading hundreds of thousands of reviews on cooler paint colors, I settled on Gray Owl.  Here is why:

Gray Owl Know-it-all:
  • Gray Owl is dominantly gray with cool, soft, and passive undertones of blue and green.  Which means, it looks badass with a variety of wood stains, stainless steel, and creams/whites.
  • Gray Owl is a light paint color - It's not light enough to be classified as an off-white, but it's also not a medium hue either.  In fact, it's right dab smack in the middle of "light."
  • With any light gray, it is susceptible to reflection and can pick up other tones from it's surrounding environment; i.e. If you have a navy accent wall, it's going to pick up the blue.  If you have a vintage forest green Chesterfield sofa, your walls are going to appear a bit on the green side.
** An added tip: Pair your Gray Owl walls with trim painted in Super White for a bright pop of freshness.  The two colors share similar undertones and go very well together.

As I was saying, we live in a typical split entry home.  For our home I used a combination of Eggshell and Flat finishes, and ended up purchasing 1 gallon and three quarts of Flat and 1 gallon of ES.  With this amount I was able to paint our downstairs and upstairs hallway, entry, living room, dining room and kitchen space.  Whatever color you're covering up plays a huge role in how much paint you're going to need.  If you have dark walls, double the amount.

Also, keep in mind that there is a huge difference between the two finishes - Eggshell has great wipe-ability with a bit of a sheen, so imperfections stand out a little more.  Flat is great for areas that don't have perfect walls - if your sheetrock is a little wonky, or if you live in a older home with plaster or a lot of imperfections from artwork being hung up over the years.

The way the house was painted with the two finishes was very strategic.  The two sheen's weren't mixed, except for one wall on accident.  You could see the eggshell punch through the flat.  Took a few coats to cover it up.

And without further adieu, a few before and afters of the back breaking work.  Don't worry, I'll pat my own back.

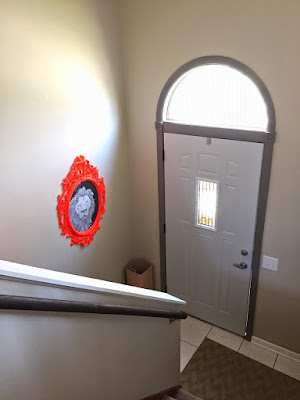
The best example can be seen in our entryway - and for the fact that I seem to have the most photos of our tiny entry?  For some reason?  It's best not to ask.

2015 ish after a new door and railing with Manchester Tan
As seen today with Gray Owl
No doubt do we have additional improvements to make - more things to hang - more things to paint. But if I had to pick any of these looks, I'd say I'll reveling in the best one yet.

Another semi-decent example is our upstairs hallway.  Please disregard the areas I didn't paint when the photo was taken - on second thought, maybe you should take a look so you can compare the yellow dirtiness of the Manchester Tan to the so fresh and so clean, clean Gray Owl.


And finally, a shot of the faux fireplace - that also got a major overall!  (Check back soon for this update) You can easily compare the two paint colours.  **Photo taken in natural light


Well, I guess that's it as far as photos that capture the impending change.  I'm hopeful the frequency of these little posts change, but you can't rush a good thing.  As always, thanks for reading!