Pages

Tuesday, June 23, 2015

Bathroom Renovation Progress

Last night I lingered in the bathroom a bit longer then usual.  It's taken awhile, but the bathroom reno is nearing it's final stages and I can't help but be excited.

A few years back we replaced our less than desirable appearing linoleum sheet with a band-aid... more linoleum flooring but in tile form.  A couple years and several bathroom paint colors later we replaced our bathtub and bathroom vanity.  That brings me to this:


Not the worst but not the best either.  When we took on this bathroom "remodel," we burned through our budget pretty quick and couldn't go much further.  There it sat, like this, for the past two years, and because this was our first for a lot of things, particularly the tiling, the bathroom surround got a little wonky.  The tile stickers lasted us longer then it needed to, and looked better than it did, but it was time to move on to real-adulthood flooring.  Lessons learned, time to fix them.  

After doing a lot of research on resale value, I found that natural stone tile is the way to go. It is clean, neutral, and goes with pretty much anything.  I was really impressed with the tavertine tile that Lowes carried.  Our bathroom space called for fourteen 18x18 tiles (about 20 square feet).  I don't care to admit how much time I spent in Lowes painstakingly hand-picking and naming each sheet of tile... but... 3 hours.

Before the tile is laid, make sure to purchase and install a backer board for the tile to rest on.  It's the proper thing to do, and coming from the Queen of Half-Assing, this is one step you shouldn't be missing.

After removing the toilet and sink, we laid the tile, using roughly 2.5 gallons of mortar for a 20 square foot space.  Let the tile cure for 48 hours or so before filling it in with the grout color of your choosing.  *Tip: Work fast, efficiently and clean your water and sponge often.


We also wanted to clean up the tub surround a bit more.  By doing this, we installed two 2x4 boards to run down the side of the tub and surround, covering them with sheet-rock. It hid the first-timer tile job pretty well.

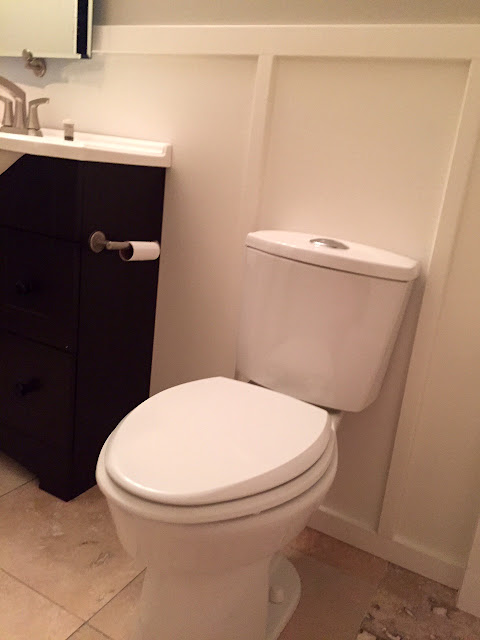
But why stop there?  Back in 1991, the sheet-rock installer guy was like, "Eh, I don't really feel like working today, so I'll just put up this wall and make the tape all squiggly before mudding.  Good enough." No I say.  Not good enough.  To fix this problem I decided to install simple faux wainscoting out of primed MDF boards to cover their despicable tape job.  Sad face.


I used my favorite-- vinyl filler to patch any holes and cracks, disguising the fact that their are MDF boards attached directly to the wall, and not in fact 'real' wainscoting.  I prefer my faux method in smaller spaces as it takes up less room.

The wainscoting was painted with White Dove by Benjamin Moore, and the top portion of the bathroom was done in Revere Pewter by Benjamin Moore.


There is obviously a lot of perfecting that still needs to take place, but I think we finally crossed the halfway point.  All that is left is the fun stuff-- accessorizing!  Ya boi!

I've been keeping my eye out for a vintage light fixture and mirror.  More recently I was introduced to a lighting and decor site called Schoolhouse Electric.  I can't tell you how many times I've filled my cart with things.  It's pressing the purchase part I can't get past. Maybe soon I'll cave.  As of right now, I have my heart set on this Grant Mirror in Marigold--


I'm also really loving this light fixture, but once again, I can't get over the fact that the fixture (excluding the shades) is pushing $200.00!!!  At this moment I am happily searching for alternatives.
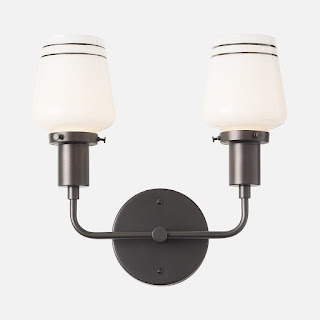
Abrams Double Sconce - School House Electric


I am very much looking forward to sharing the great reveal.  Even I don't know what to expect.  If you have any ideas you'd like to pass this way when it comes to various lighting companies, cool mirrors you've seen, or whatever else, you've got my attention.  Until then!

XO
Jenna

UPDATE:  Check out our latest snapshot of our bathroom progress.  We are always revamping things around these parts, so check back again for more updates.

Tuesday, June 16, 2015

A Window of Opportunity

Hello fellow readers,

Just stopping by with a quick fix and some tips when it comes to updating the accent wood in your house.

When we first moved in, the oak didn't bother me as much.  Then we noticed how scuffed the trim was.  I pulled off the tiniest trim piece to inspect it... but it didn't stop there.  The builders used three inch nails to secure the trim.  A little much?  It was rough.  There was absolutely no way we were preserving what we had.  Overtime we managed to replace most of the trim in our house with white.  Not sure why I am making such a big story about this...

We had an oak stained bay window that was a focal point, but maybe not in a good way?


Based off of feedback from others, the oak had to go.  Investing a lot of money into replacing everything was not ideal with our current bathroom reno and need for some new doors and windows.  Little to no budget?  No problem.  I did a similar technique that I used on our kitchen cabinets (find this here), by using oil based primer.  Depending on how much use the area you are painting is going to get, it wouldn't be a bad idea to do multiple coats of primer, allowing ample drying time in between.

Our bay window was given two coats of primer, and two coats of Behr's primer+paint in Silky White.  Even then, our dog still nicked it--squirrels-- I'd argue that it wasn't dry, but in reality, the bay window shelf could have used three coats of oil based primer.  Just remember that when you are applying oil based primer, use multiple foam brushes for ease.  If you want to clean a paint brush off with paint remover, feel free.  The world could always use more over-achievers.

I knew the window was going to look brighter, but this blinding was not expected.  It has been a very welcomed presence in our living room.  We finally shed the curtains too.  Thank goodness for decent tree coverage. Three months later I am sure I will re-visiting this new-found "issue."


Another step towards home renovation completion.  I'd hate to think of the cost of replacing our oak trim, instead of painting it.  I've got better things to spend my money on and I am sure you do too.  If you have been hesitant to change up your window color, or found this post to be inspiring enough to give it a try, what are you waiting for?  This is your window of opportunity!

Tuesday, June 9, 2015

Stair Railing Make-Over

...still alive.

Many hugs and thank you's to those who continue to check back to see if we have our life together yet.

Recently I took on a new job, which means back to full-time status.  Ugh.  It also means our "extra" time is that much more valuable, therefore, the project wagon has not been as full lately.

I am here to share a couple fun updates though.  For any of you homeowners out there living in a "barely meeting code" home, like us, you sometimes wonder why it took you so long to fix/secure/replace something pretty sketchy.  Take our stair railing for example.  That thing wiggled and wobbled more than... oh... I'll just stop there.  I was convinced replacing the stair rail would be an easy fix.  For those of you who have replaced a newel post and railing, you probably understand how cray-cray my thoughts were.

Rewinding a bit, a few weeks ago we went to Gold Rush with some friends.  I had a 'Shane Approved' list to go off of, and an old newel post was listed in my top three.  I was expecting to find, oh, I dunno, like a dozen of these suckers?  Apparently, they are hard to come by.  You know that feeling you get when you spot a $10.00 bill on the ground?  Exact same feeling I had when I saw the only newel post in all of Gold Rush staring right back at me.  It was dirty and beautiful.  The dude was charging $45.00 FIRM.  He said he ripped it out of an old farm house in one of the Dakotas.  Price checking new newel posts at home improvement stores, they were more expensive, and not nearly as much girth.

Sold.

It took a few weeks, but we finally started making headway on the railing.  Simple enough to rip out the old railing, and replace it with the new, right?  Wrong.  What I failed to realize is the newel post is actually put in before the flooring, to ensure stability.  Not sure what went wrong hurr... but stability was not it's strong suit.

Plan B.

We ripped out the old railing system, trying to preserve the base stair thread (with the already drilled peg holes).  The stair thread got a good sanding, and a fresh coat of stain.  Next, we sawed the old newel post off, right at the base.  Instead of removing the old newel post, it was thin enough for us to create a slip with the new (old) newel post.  We carved out a square at the bottom of the new (old) newel post, and slipped it over the old craptastic one, and secured it using our nail gun.  Next, we primed and painted our new stair spindles Silky White by Behr.  I ended up picking up a low-profile stair handrail, and cut my own piece of wood to use as the rosette, staining it the same color as the thread base. Why low profile?  I really wanted the newel post from Gold Rush to be the focal point.

Chiseling a hole to use as a slip.
Providing extra security for the newel post

Yesterday evening we finally got around to securing the spindles to the stair handrail and to the stair thread.  We gave it a little shake and it hardly moved.  Vast improvement from what was there before.  I would trust that a whale could probably lean on it.... hmm.  Maybe.

For this project, we used a lot of Poplar wood.  I like the variation of the wood, and it tends to be a bit more forgiving as opposed to hardwood (ha) like oak.

And just for comparison sake, here is a before and after shot--

Now
2006
Pre-now 2015


My apologies.  I seemed to have disliked the old set-up enough for me to avoid capturing photos of it... but you get the gist of it.  Now to put our home back together again...  Tootles.