Pages

Wednesday, January 8, 2014

Love Your Entrance and Make it Grand

This isn't so much a DIY post, but more of a consideration to love the entrance to your home.  I really feel that this is an area that may get overlooked with design and decor.  It certainly did in our home... until this past weekend.  The entrance of your home is basically a first impression.  New visitors coming in are either going to feel welcome and comfortable, or kindly find it in their hearts to look the other way. This can be super challenging if you live in a split-entry home, where your entrance is the size of a peanut, and you have to contort your body just to get around the door.  And taking your shoes off?  Forget about it.  I want to meet this person who thought this space was sufficient enough for anyone over 3 feet tall.  Once I do, you better believe I will come up with something clever.  Paybacks... paybacks. Moving on.  Because you don't have a lot of space to work with, and no matter how much you want that beautiful foyer table with some big ass flowers sitting on it when you walk in-- it is NOT going to happen-- frankly you are going to have to deal and think outside of the box. This is where four key items come into place.  Art, hooks, floor, and paint.  These four secrets will make your entrance-split or not- shine bright.

Art is super subjective, so make it count.  The key when choosing your art pieces is to find ones that;
A. Make you feel something
B. Is special and personal to you.  Heck, everyone is creative in some way.  Apply those talents and try to create something uniquely yours!
C. No matter how many years you have had it, you still stop by once in a while to say hello.
D. Are originals and support local, and starving artists (people like me) when you can.

Things to avoid:
A. Don't buy just to buy.  You need to fill up that giant empty wall space?  Maybe give it a little thought first.
B. Don't buy art to impress others.  Other people don't live in your home.  You are ultimately the one that has to look at it.
C. Unless you really like that super famous and slightly overused painting, try some originals on for size.  Etsy is a great place to check out. You can purchase incredible prints from passionate artists.  We are big advocates for all artists in our home, but you get to a point when you have seen Starry Night (guilty) or Scream one too many times.  Another place to check out?  Your local thrift store.
Ch, ch, check, check it out- www.etsy.com

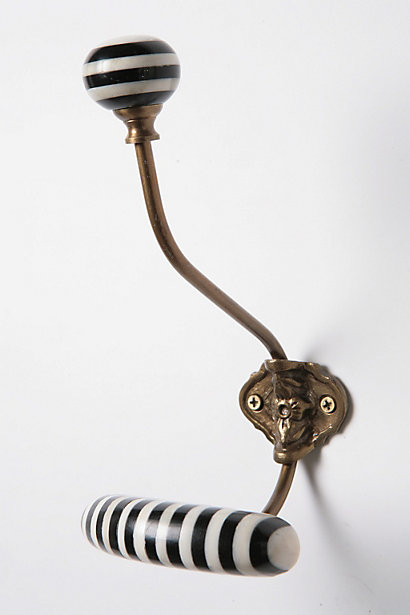
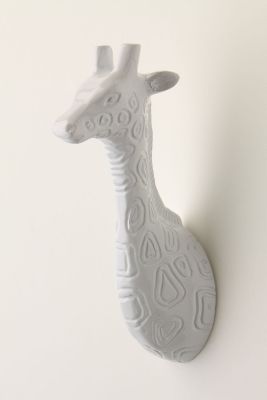
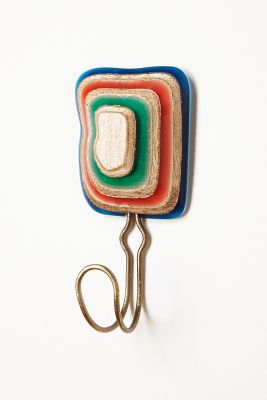
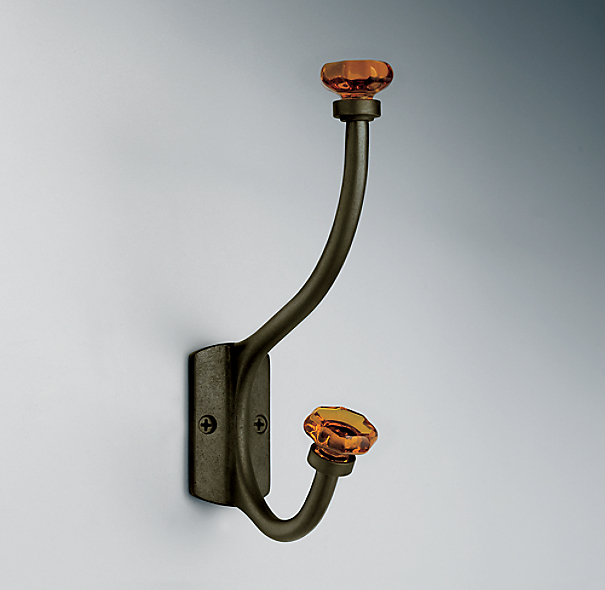
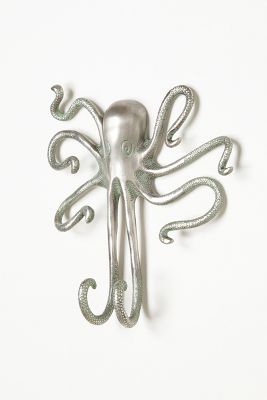
Hooks are not only functional, but they can also serve as decor.  There is an abyss of hooks to choose from out there.  Antique hooks, basic hooks from home improvement stores, or my favorite, STATEMENT hooks.  Capitalizing statement really made a statement, eh? Here are a few examples of some that hit my happy bone.

View From Here HookYilan HookGrand Hat HookTraditional Amber Glass Hook
Rabbit Forestry HookEight-Arms HookSchoolroom Hook Rack

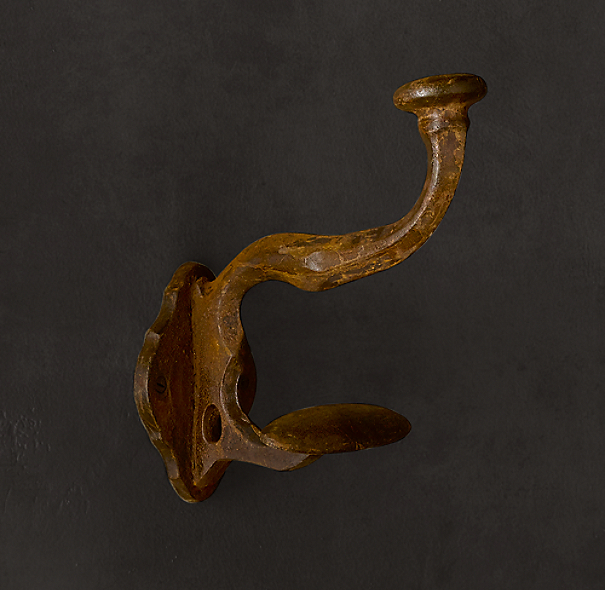
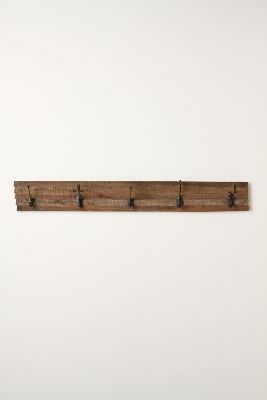
If you can't justify spending $18.00 or more dolla dolla bills y'all on a single hook-- and we totally don't blame you, we can't either-- then consider fashioning your own.  Get some basic hooks and a piece of wood for a couple dollars at a home improvement store.  You can even check out Craigslist for free old barn wood, hopefully termite free. Maybe a can of spray paint- PRIMER FIRST, a couple eye hooks and wire in the back, and go to town.  The barn wood piece displayed above is a prime example of what you can make for a fraction of the cost.  Awesome show, great job!

Sources:
anthropologie.com
restorationhardware.com/


Floor.  You need a floor to walk on, obvi.  Just a tip:  I am a big advocate on not having white tile.. because we do.  It blows balloons. You may think, Eureka!  White will make the space look so much bigger and cleaner!  No, just no.  I am going to stop your unreasonable thoughts right there.  White tile will show everything.  Go ahead and get it though if you live to clean... er... clean to live?

If you stop to think about how many times an entryway is used in a given day, you would be surprised.  It is the portal for coming and going.  Your floor should be strong enough to hold up to the every day homecomings.  Meaning, your floor should not be made of hay or dirt.  That is kind of a bad idea, but tile is never a bad idea and hardwood floors are always genius.  Together the two make the sexiest hybrid floor to date.
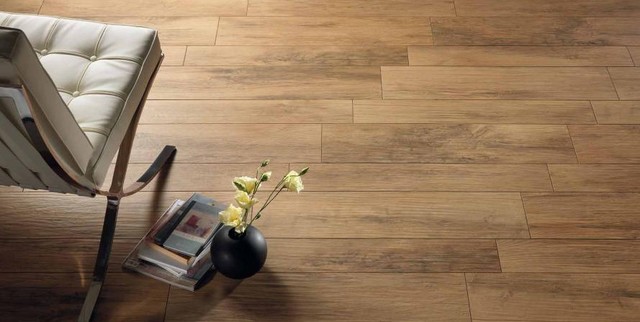


Told you so.


Paint can make or break your home.  A few posts ago I talked about all of the different paint color we had in our home the last seven years.  Needless to say, we had a very broken home.  Paint takes thought.  If you are using multiple colors, they should be cohesive with one another.  So, no gray with a warm base mixed with a cool base.  It.does.not.work.  I hate to say that you need to sacrifice color, because that shouldn't be the case.  Just find harmony.  Also, keep in mind your trim color.  If you changing it will make the world of difference in your home, why not?  With that said, we went against the grain a bit this past weekend.  I've always thought trim should be white or wood.  No, no.  Not the case.
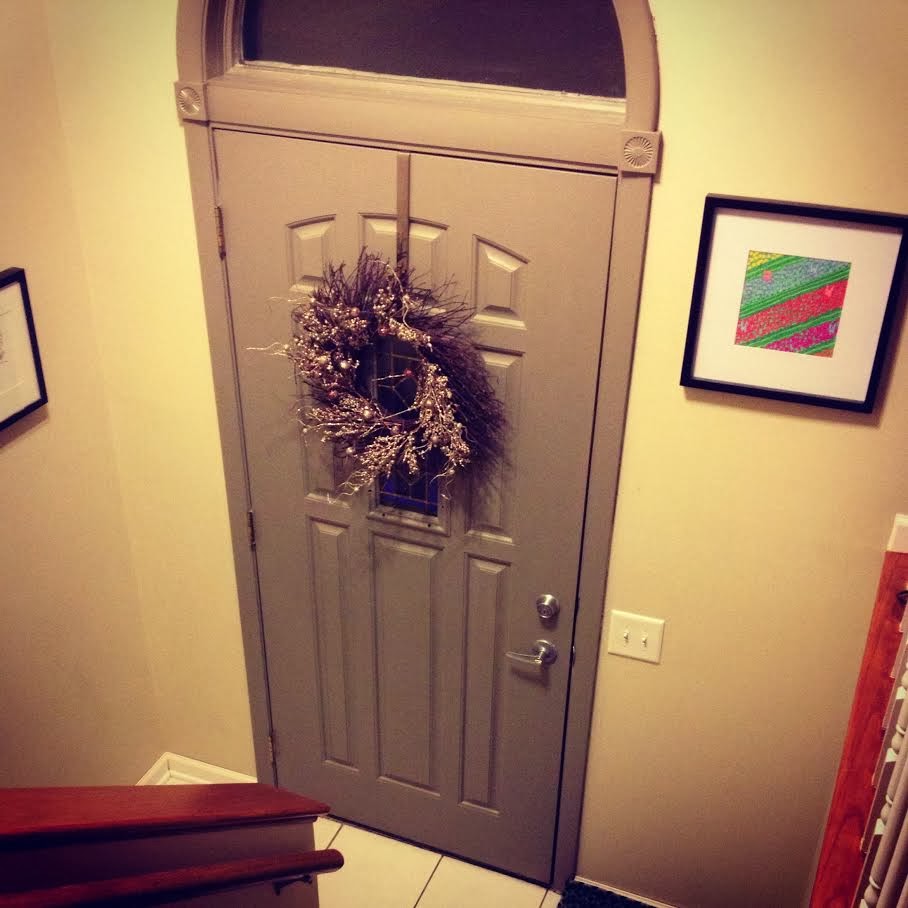
Enter exhibit A.

See?  White floors suck suckers.


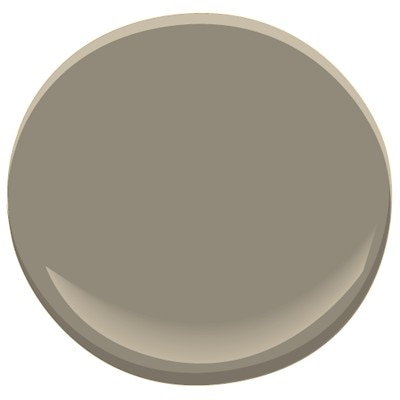
The entrance to our home looked forgotten about.  That's because it was.  So, I went to my friends at Hirshfields for a little paint fix.  I'm still deciding if them knowing me by name is a great thing, or if I truly have deep-underlying issues.  Hmm yeah, issues.  I picked up a quart of Squirrel Tail by Benjamin Moore in a satin finish.  I am totally in love with this color and it is probably because it looks really similar to the door color in Big Bang Theory.

I started out by sanding and priming the door.

My intention was to paint the door on it's own, but I couldn't help myself. Something told me to keep going, so I did. There is no helping that floor by the way.  Just ignore the dirt.  We obviously do.


This is after the first application of paint on the door, AND trim.  I am really happy I went with it.  It makes the door look like a solid piece rather than breaking it up.  Plus, it really warms up the tiny, almost useless area.


The application process is complete, yo!  The floor was even cleaned just for your viewing pleasure.


I am sure there are a million other little things that we could do in our entryway- like make it bigger for one, but we can't, and we won't.  All we can do is work with what we have and make the best of it.  We hope you have fun making your entryway a bit more special, and grand, like you.

Fun fact- I tried doing research on who designed the split level home.  It gave me every other piece of information but that.  They probably don't want to own up to it because of crazies like me.  If you happen to come across this bit of information, for the love of all things holy, tell me.  As always, thanks for reading.

Monday, January 6, 2014

Ikea Hack (RAST Dresser)

The weather this weekend was, for a lack of a better word, obnoxious.  I didn't like anything about it.  It is simply a reminder that I don't belong here.  Aw, I'll just have to suck it up I guess.  So, because the weather loathed us Articsotans this weekend, I found it to be the perfect opportunity to tackle my honey-do list. (queue Sky Battle in Deathly Hallows)

First up on the chopping board-- the Ikea RAST Dresser.  You can find these little buggers at Ikea, duh, for $34.99!  They are functional, inexpensive, and have a life expectancy of five years, easy.  The coolest part about these dressers?  The material is raw, meaning the ideas are limitless.  If you haven't checked out Ikea Hackers, here is the link: http://www.ikeahackers.net/ It is here that you can find some great ideas on refashioning your neat finds from Ikea.


I had a pretty good idea of the look I was going for with my dresser.  But just for fun, let's check out some other good folks RAST hacks for inspiration.


I probably shouldn't even start out with this one... This would be the "overachiever" of the bunch, but it just proves that anything is possible! Get fancy with it.


Two-tone RAST dresser.  Very nice.


Here is another super awesome example... it is the best one yet, isn't it?  ISN'T IT?!  Good, because this is the ones I am going to show you how to make.  If you hate it, well then, you're on your own.

Step 1:  Obtain an Ikea RAST dresser.  Because the wood is not treated in anyway, you really want to think about the longevity of your piece and what you are going to be using it for before proceeding.  For our RAST dresser, we are using them as nightstands, therefore, they will be out of the way for the most part.  We typically have cups upon cups sitting on our nightstand filled with vodka water, so we knew that putting a protective seal on it would be key to prevent water rings.

Step 2:  Sand me lightly.

Step 3:  Getchyo paint n' stuff.  For this particular dresser I decided to use a primer before getting down to the nitty-gritty with the actual paint color.  Kilz latex white primer would do.  A quart will put you back about eight bucks.  Something to keep in mind when you are priming your piece- It does not need to look pretty.  It can look sloppy as hell.  Just make sure it isn't gooped on there.  We are looking for a "smooth and unevenly painted finish."  Primer also has a really awesome way to make imperfections stand out more.  This would be the time to get some last minute sanding done.


Step 4:  After the primer has set and dried you can begin your application.  You can pick your weapon of choice:  Roller or paintbrush.  If you use a paintbrush, make sure you use short and even brush strokes.  The more coats of paint you have on your dresser, the less amount of brush strokes you will see.  I would venture to say 3 coats of paint on your dresser would suffice.  If you decide on a roller, the application process is much smoother, however, the downside is you could potentially get air bubbles.  Instead of using a foam head, I would suggest woven Dralon fabric.  Purdy is a line that carries this product.  If you are big on rolling... ha.. the Dralon fabric will prevent less bubbles.  For color reference, I picked up a quart of Equestrian Gray by Benjamin Moore in a satin finish.


Step 5:


Step 6:  While my second coat of paint was drying, I went ahead and started to work on the handles.  Here is the list of materials:

* 1 used leather belt purchased from Savers for $2.99 (men's size 36+)
* Cabinet Knob Screws 8-32 x 1-1/2 (need 6)
* 8-32 bolts (need 6)
* Xacto knife

Step 6- A(?):  First things first.  Measure the distance between the two pre-drilled holes in the dresser and mark the backside of your belt.  It would be a good idea to factor in how long you want your leather handle straps to be, and how droopy or tight you want it. For these particular handles, I wanted to make sure I could get a hand in between the dresser itself and the belt.  Also, keep in mind that you should start from one side of the belt and work your way to the other end.  That way you aren't wasting perfectly good leather.  Man, Step 6 sounded dirty.


B.  Once you get your markings established on the back of your belt, use an Xacto knife to twist in a circular motion through the belt.  Tip:  Do not make your hole too big.  It should be the size of the very tip of a pen or pencil.  Another tip, don't twist a hole into your finger.  Be careful.


C.  Once the holes are carved out of the belt, take a knob screw and twist it through the hole until the head is flush with the leather band.


D.  Cut the straps to your desired length.  Remember, you need THREE straps to complete this dresser so measure accordingly.


E.  Once the paint has dried for about 3-4 hours, or is dry on contact, (You can check this by stroking the back of your hand on recently painted surfaces.  If it feel sticky or balmy, it isn't ready yet!) you can add your hardware.  Put the knob screws through the holes and secure the backside with a bolt.  You could even throw a washer in there for added support.  (Notice how I did not paint the inside of the dresser.  That's called laaaazy, peeps.  But you can't see it!  Ha!)


Step 7:  You can seal your paint by using a high gloss top coat.  I used Minwax water-based Polycrylic in Clear Gloss-- see you later water rings!!


Well, thar she blows!  I am really diggin' it.  Hope you do too.  This is a pretty basic hack, but your ideas could be endless!  (think upholstery tacks or stencils?)

Stay warm out there friends.  -40 below can feel like a real asshole.


Thursday, January 2, 2014

Hutch Made Modern

Happy 2014 Everyone!  How is the resolution making process going for you?  Did you wake up this morning super refreshed and ready to start your year long trek of doing something that's typically against your nature?  Maybe you woke up with a two day hangover?  This is why our home tries to have several resolutions... one is bound to work out for the year, right?  So far we are starting off on the right foot with another DIY blog post!  Fist pumps!

A few years ago I ventured into a consignment shop on Broadway during my lunch break.  Sitting in the corner of ReFashion Consignments was the sickest looking hutch I have ever seen.  I'd been checking out what would be considered "home staples" online around this time, and by golly this was on the list!  With a price tag of 75 bucks you just couldn't go wrong!  Ya couldn't!


As excited as I initially was about this piece, me and the hubs had a very traumatic evening trying to get this P.O.S home.  It all started with snow and a manual truck with a backwards clutch.  I would have almost been okay leaving it on the side of the road.

The biggest mistake was picking this up during rush hour traffic on Broadway in a truck that stalls at intersections, during a snowstorm.  Recipe for disaster?  Yep.  The next mistake was the fact that we are relatively average-sized people.  The sales lady was insistent about the 200 pound hutch being a solid piece.  Shit.  She also made it clear that we needed to carry it out by ourselves.  Shittier.  It took us 15 minutes to move it five feet.  We still had 30 feet to go.  I couldn't help but look pitifully into the eyes of the shoppers who were all thinking the same thing... "sucks to be you."  One guy couldn't take our pain anymore and decided to help us out.  (Wherever you are, seriously, thank you)  He and Shane managed to get the piece loaded into the bed of the truck.  As soon as we laid it down in the bed, the piece broke!  It split in two!!!  Or so we thought.  Turns out it WAS NOT a solid piece in the first place.  Needless to say, unloading was a tad easier than loading.

Once the two pieces were safe in the kitchen, it was time to get crackin':

Step 1:  The finish of the wood was a shiny veneer.  The veneer had little to no wear on it, but it was fugly and had to go.  When you are working with a surface that has any sort of sheen to it, it is best to lightly sand the piece with 100 grit sandpaper.  Give it a good wipe down once you are finished so you aren't getting debris mixed in your paint.

Step 2:  Use an oil based primer, like Zinseer Smart Prime, on your piece.  You can pick this up at any local hardware store.  When you are painting it, there will be some spots that are thicker with paint than others.  No worries though.  Just as long at the surface is covered, that is all that matters.  You can use either a paint brush or a foam roller.  Because this is only primer, using a foam roller for larger flat surfaces will cut your time in half.  You can use the paint brush to cover areas with moulding or fine details.  **Tip:  You really want to avoid globbing the paint on.  This causes drip marks and even worse, frustration and abandonment.  Two thin coats will take less time than one thick coat and additional sanding.

Step 3:  Go to your favorite paint store and pick up a latex paint base in a semi gloss finish to complete your look.  In this case I picked up White Dove by Benjamin Moore.  If this is your first major painting piece, you can stick with your foam roller.  Keep in mind that multiple thin coats are best.  If you are a little bit more advanced with your painting skills, you can use a small brush and apply light brush strokes.  The more coats you do, the less your brush strokes will show up.  Two coats is passable, three is exceptional.  (Note:  Even if you are using a 2 in 1 primer, you may still get chips in your paint.  Always use a primer before your actual paint color no matter what.  Just do it.)


               (White Dove by Benjamin Moore)

Step 4 (Going the extra mile):  Once you feel good about how the color turned out, you can either leave the piece as is or you can add a couple of years to it.  This is never a bad idea if you have kids who like to color on furniture, or if your furniture piece will be in a high traffic area.  Use a brush to apply a clear water-based poly and cover your piece from head to toe.  I like to use Minwax Water-Based Poly in Clear Gloss.  This will give it a nice sheen and better yet, a chip free and easy wipeable surface!  Score!

Step 5:  Let your piece dry.  If you have glass windows on your hutch, like I did, or another piece of furniture you are working on, you can use this time to easily clean up the glass.  Lightly scrape it with a plastic blade or putty knife.  To avoid this step all together, make sure you tape off your glass before you start painting.  Windex also does wonders getting that extra paint off.

Wa-la!


Circa 2012.  There has been some changes with this piece since 2012.  Another post to come on these particular ch-ch-changes.  It served its purpose for how it looked then, but I have to tell ya, it still looks a hellavalot better then it's initial brown stained surface.

Total project cost: $90.00 with tax

Happy painting, folks!